miércoles, marzo 28, 2007
PBB SideBar v1.00 DEMO
PBB SideBar v1.00 DEMO: "MySideBarB = new PBBSideBar({
position : 'left',
styles: {
'width': '500',
'color': 'white',
'background-color': 'red',
'opacity': 0.6
},
showDuration: 500,
showEffect: Fx.Transitions.backOut,
hideDuration: 500,
hideEffect: Fx.Transitions.quadInOut
});"
Publicado por
SiTo
en
3/28/2007 09:37:00 a. m.
0
comentarios
![]()
Videobox: Lightbox for videos, Youtube, Metacafe, Google Video, iFilm
Videobox: Lightbox for videos, Youtube, Metacafe, Google Video, iFilm: "Videobox: Lightbox for videos"
Publicado por
SiTo
en
3/28/2007 09:32:00 a. m.
0
comentarios
![]()
MOOdalBox, a modal box based on Slimbox code « mootools forums
MOOdalBox, a modal box based on Slimbox code « mootools forums: "Sam Lewis
Moxie Media, LLC
GoMoxieMedia.com"
Publicado por
SiTo
en
3/28/2007 09:29:00 a. m.
0
comentarios
![]()
Slidinglist
Slidinglist: "1-2Schotse hooglander
- 1-2Gaur
- 2-2Cows
- 1-2Groninger Blaarkop
- 2-2Lakenvelder
- 1-2Yak
- 2-2Gaur
- 1-2Yak
- 1-2Groninger Blaarkop
Publicado por
SiTo
en
3/28/2007 09:24:00 a. m.
0
comentarios
![]()
NYCG - XPOP
NYCG - XPOP: " xPopMenu - Patrick Boucher's python extension class for XPOP"
Publicado por
SiTo
en
3/28/2007 09:22:00 a. m.
0
comentarios
![]()
martes, marzo 27, 2007
martes, marzo 20, 2007
InfoQ: Integrating Java Content Repository and Spring
InfoQ: Integrating Java Content Repository and Spring: "What is JSR-170?"
Publicado por
SiTo
en
3/20/2007 08:05:00 p. m.
0
comentarios
![]()
Devthought - Guillermo Rauch’s Blog » CSS+Javascript power. Fancy menu
Devthought - Guillermo Rauch’s Blog » CSS+Javascript power. Fancy menu: "CSS+Javascript power. Fancy menu"
Publicado por
SiTo
en
3/20/2007 08:19:00 a. m.
0
comentarios
![]()
lunes, marzo 19, 2007
How Web 2.0 Logos are drawn (Photoshop)
How Web 2.0 Logos are drawn (Photoshop): "2. Load style"
Publicado por
SiTo
en
3/19/2007 04:38:00 p. m.
0
comentarios
![]()
8 web menus you just can't miss
8 web menus you just can't miss: "8 web menus you just can't miss"
Publicado por
SiTo
en
3/19/2007 04:36:00 p. m.
0
comentarios
![]()
71 de meniuri CSS - Utopic | Razvan's Nerve
71 de meniuri CSS - Utopic | Razvan's Nerve: "Tabtastic : Gavin Kistner."
Publicado por
SiTo
en
3/19/2007 03:45:00 p. m.
0
comentarios
![]()
viernes, marzo 16, 2007
Ajax Data Transfer Format for Sending Data to the Server Side
Ajax Data Transfer Format for Sending Data to the Server Side: "Ajax Data Transfer Format - UED(Url Encoded Data)"
Publicado por
SiTo
en
3/16/2007 11:23:00 a. m.
0
comentarios
![]()
Control.Tabs : Projects : LivePipe™
Control.Tabs : Projects : LivePipe™: "Control.Tabs is a simple way to create accessible, flexible & unobtrusive tabbed interfaces in your applications or pages. It uses anchors and named elements to function, so browsers that do not support javascript will still be able to navigate through your tabs."
Publicado por
SiTo
en
3/16/2007 11:19:00 a. m.
0
comentarios
![]()
miércoles, marzo 14, 2007
Photoshop Tutorials and Articles - Tutorial Blog
Photoshop Tutorials and Articles - Tutorial Blog: "Tutorial Blog - Photoshop tutorials and design articles"
Publicado por
SiTo
en
3/14/2007 11:23:00 a. m.
0
comentarios
![]()
Draggable Tree - Using Mootools
Draggable Tree - Using Mootools: "Reorganize the tree structure using drag and drop. An indicator will show where
your drop will end up."
Publicado por
SiTo
en
3/14/2007 11:12:00 a. m.
0
comentarios
![]()
martes, marzo 13, 2007
Reflection.js for mootools · digitalia.be
Reflection.js for mootools · digitalia.be: "This is an improved version of the reflection.js script rewritten for mootools. It allows to add instantaneous reflection effects to your images in modern browsers, in less than 3kb."
Publicado por
SiTo
en
3/13/2007 08:35:00 a. m.
0
comentarios
![]()
viernes, marzo 09, 2007
jek2kdotcom » Blog Archive » Drop down with Javascript (EN)
jek2kdotcom » Blog Archive » Drop down with Javascript (EN): "Drop down with Javascript (EN)"
Publicado por
SiTo
en
3/09/2007 02:58:00 p. m.
0
comentarios
![]()
multi-file selector based on mootools « mootools forums
multi-file selector based on mootools « mootools forums: "multi-file selector based on mootools"
Publicado por
SiTo
en
3/09/2007 02:54:00 p. m.
0
comentarios
![]()
My playground: Tabs, Ghost Drag&Drop and more « mootools forums
My playground: Tabs, Ghost Drag&Drop and more « mootools forums: "Tabs
The original author asked me for a moo-conversion, work is in progress. Will refactor still much of the code and add support for Dragging into tabcontent (Dragging over a tab activates it).
http://dev.digitarald.de/tabs.html
Playground Dragging (Reverse Dragging)
Dragging reversed, wonky because onStart and onComplete have this 10ms delay, so in some situations the position is changing.
http://dev.digitarald.de/drag.html
Fly-over-background
Scrolling effect, like the effect in flash used on some nice sites. Scrolling from content to content that is attached to a big background image. Just a performance check ;)
http://dev.digitarald.de/tile.html
Ghost Dragging
Shopping Card dragging? Drag your favorite element and drop a copy of it, like in Rich Client Shopping cards or Item-to-Category. Very basic, added my personal spice with ajax and more checks inside my own rich client project ;)
http://dev.digitarald.de/ghostdrag.html
More to come (Better Lightbox, mooSelectBox, conversion of Floating Windows)."
Publicado por
SiTo
en
3/09/2007 02:44:00 p. m.
0
comentarios
![]()
moo data
Move data from one list to the next, and store it in an array until the user submits the selection. It will only load one of each.
moo data
Publicado por
SiTo
en
3/09/2007 02:42:00 p. m.
0
comentarios
![]()
53 CSS-Techniques You Couldn’t Live Without | Smashing Magazine
53 CSS-Techniques You Couldn’t Live Without | Smashing Magazine: "January 19th, 2007"
Publicado por
SiTo
en
3/09/2007 02:31:00 p. m.
0
comentarios
![]()
justinmaier.com
Ver la sección de Links
justinmaier.com
Publicado por
SiTo
en
3/09/2007 02:29:00 p. m.
0
comentarios
![]()
mootable example
mootable example: "mootable example"
Publicado por
SiTo
en
3/09/2007 12:31:00 p. m.
0
comentarios
![]()
jueves, marzo 08, 2007
miércoles, marzo 07, 2007
An Introduction to JSON
An Introduction to JSON: "Example code"
Publicado por
SiTo
en
3/07/2007 12:18:00 p. m.
0
comentarios
![]()
viernes, marzo 02, 2007
Manuales
Publicado por
SiTo
en
3/02/2007 12:25:00 p. m.
0
comentarios
![]()
Nicora | Articles | Learn to create your own Web2.0 Logo
Publicado por
SiTo
en
3/02/2007 12:22:00 p. m.
0
comentarios
![]()
No Relation» Blog Archive » Photoshop “Glass Text” Tutorial
No Relation» Blog Archive » Photoshop “Glass Text” Tutorial: "As I have announced it before, I am going to be posting Photoshop tutorials on this blog. Some tutorials are old others are new and will be posted for the first time. So stay tuned!
Today I am going to start off with quite a simple tutorial that will show you how to achieve a glassy text effect ."
Publicado por
SiTo
en
3/02/2007 12:21:00 p. m.
0
comentarios
![]()
Web 2.0 how-to design style guide
Web 2.0 how-to design style guide: "Web 2.0 how-to design guide"
Publicado por
SiTo
en
3/02/2007 12:07:00 p. m.
0
comentarios
![]()
Photoshop Tutorial: Create glossy button for web 2.0
Photoshop Tutorial: Create glossy button for web 2.0
Photoshop Tutorial: Create glossy button for web 2.0
Published December 27th, 2006 in Photoshop Tutorial.
This tutorial will show you how to create some of the more popular Web 2.0 style button using Photoshop CS. Full tutorial after jump.
1. Creating the base
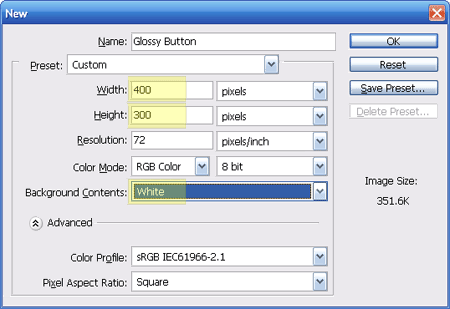
Fire up a new canvas and adjust the following settings (marked in yellow) according to the image below. The rest should come as default. You might want to double check with the defaults too.
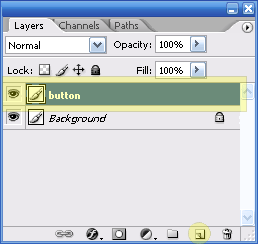
Create a new layer call ‘Button’
On layer ‘Button’, select the Rounded rectangle tool
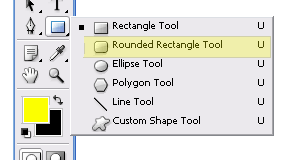
give it a radius of 7px

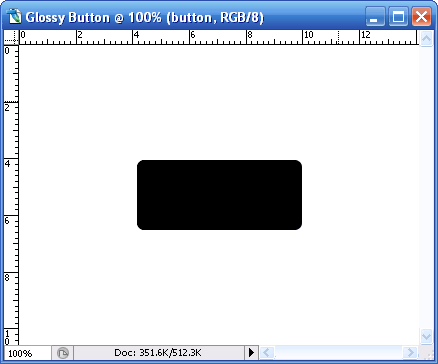
and draw a rectangle similar to the image below.
2. Red button
Right click on the Blending Options for ‘Button’ layer
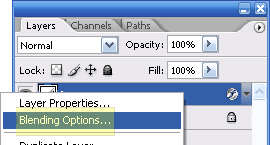
and tweak the following settings for
Drop Shadow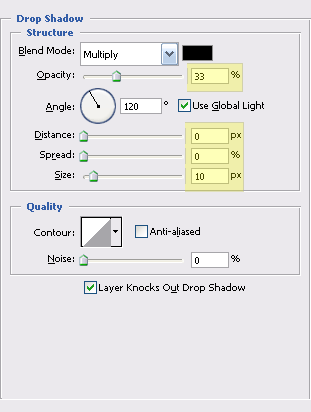
Inner Shadow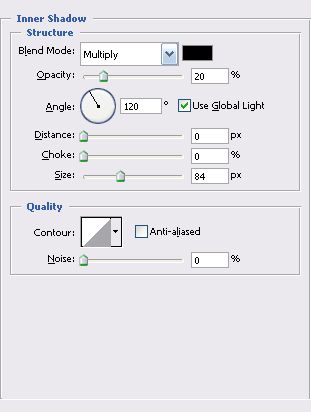
Bevel and Emboss, and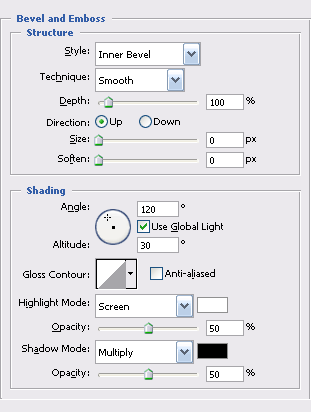
Gradiant Overlay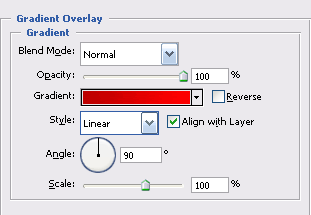
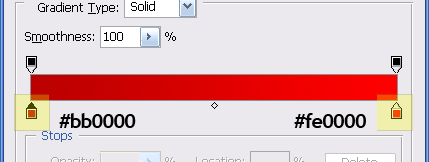
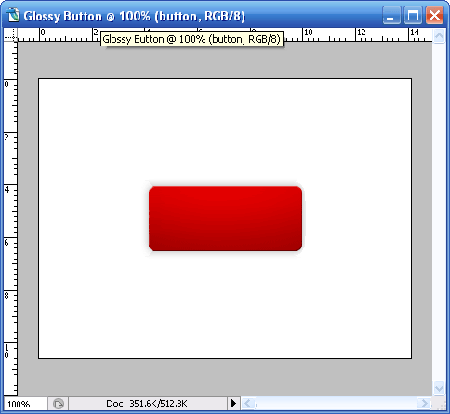
Your button should look something like this
3. Glossy and a little tweak
Create a new layer call ‘Glass’
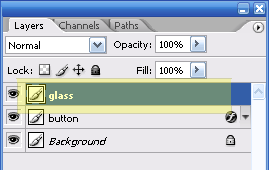
Select Retangular marquee tool, make sure you are selecting ‘Button’ layer. HOLD your
Select ‘Glass’ button now, hold the
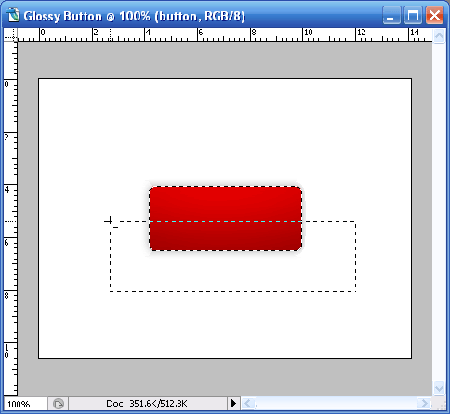
Fill the selected area with white color #ffffff using Paint Bucket Tool

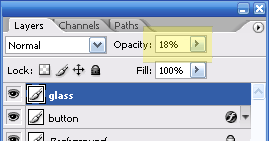
Adjust the opacity to 18%
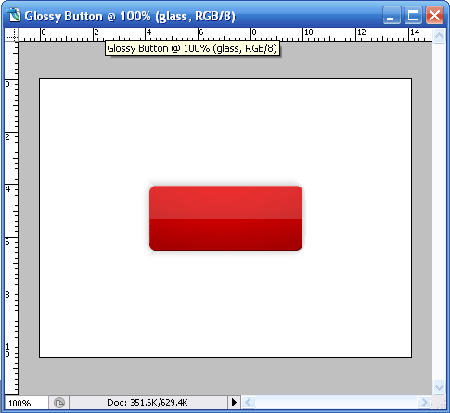
and you should have glossy button looking like this.
4. Pattern Overlay
Lets give the button some slight pattern overlay. I’ll be using the custom stripe5px created earlier. Click here to read “How to create custom pattern”
Create a new layer call ‘Pattern’ in between ‘Button’ and ‘Glass’ and proceed with Blending Options.
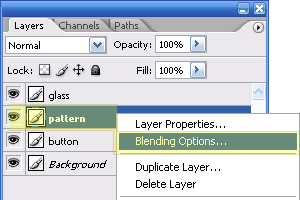
Select Pattern Overlay, choose Stripe5px (or any pattern you’ve created) and click OK then close the dialogue.
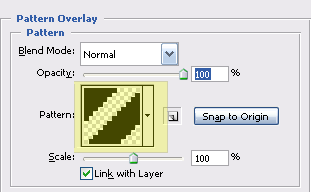
Make sure you are still on Rectangular Marquee tool, hold
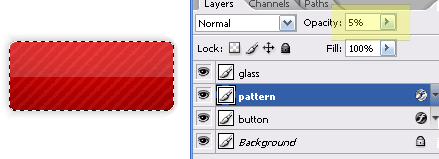
5. Inserting Text
I’ll throw in some random text in white #ffffff color with the following settings

and the following blending effects on my text’s layer.
Drop Shadow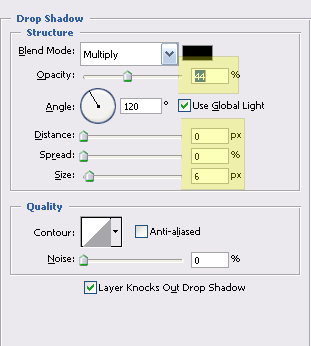
Output
You should get an image like this.

Publicado por
SiTo
en
3/02/2007 11:13:00 a. m.
0
comentarios
![]()
IRIS Design » Archive » Web 2.0 style buttons
IRIS Design » Archive » Web 2.0 style buttons:
Nowadays Web 2.0 style becomes more popular. Every day tons of sites which has simple, bright and very interesting things, appear in Network. There are no standards about creating any Web 2.0 elements, but we have several typical features, for example and clean colors, many gradients.
Today I want to show you how to create Web 2.0 styled button using Adobe Photoshop CS2.
- Open the Photoshop, create new document for the button.
- Create shape for future button using Rounded Rectangle tool on toolbar, specify round radius.

- Right click on rectangle layer in Layers palette, choose Blending Options.
- Set the Gradient Overlay effect parameters. I have following color of first and second thumb: 434343, third – 000000.

- You can find Stroke effect parameters below. Stroke color is 363636.

- Set the Inner Glow effect options.

- As the result you will get following image:

- Create rectangle using Rounded Rectangle tool, it will be used as button glare.

- Right click on “glare” layer, choose Rasterize Layer.
- Click Edit in Quick Mask Mode on toolbar.
- Choose Gradient Tool, create gradient like following:

- After leaving quick mask mode, you will get selection area. Click Delete button.

- Add layer with text “Entries RSS” and RSS icon. Set Drop Shadow effect parameters.

Now you got following button:
After changing different effects parameters, adding or changing elements, I got following buttons:
Updated: You can download PSD sources here.
Publicado por
SiTo
en
3/02/2007 11:12:00 a. m.
0
comentarios
![]()
Web 2.0 Colour Palette
Web 2.0 is about finding new ways to interact on the internet and collaboration, at least to a certain extent. Those of us in the know realise what Web2.0 is really all about - putting things on super shiney tables and painting them with gradients and candy colours and shiny silver and stuff.
Organised into 3 distinct colour groups - neutrals, muted tones and bold colours, you may recognize a few of the shades from some of your favourite Web2.0 sites. Now you can quickly and easily assemble your own colour scheme - simply choose any number of bold or muted colours, then add as many neutrals as you see fit - you'll have a Web2.0 masterpiece in no time at all!
Neutrals
Bold
Muted
Publicado por
SiTo
en
3/02/2007 10:06:00 a. m.
0
comentarios
![]()


